This is another article in our series explaining how we built a Dynamic Page Layout system in SharePoint 2013. For an introduction please read here. In this post I'm going to cover how we persist the page level configuration for our Dynamic Page Template. i.e. how each row in our Dynamic Page is configured, and ordered.
To recap, each row is configurable to use a specific template (i.e. Full Width, 2 columns, 3 columns etc.). In addition to the template used, we also need to store where on the page the row should go (a positional index), if it should have a background colour, top/bottom margin and top/bottom padding and any other required Row-level configuration options. So we needed a place and method to store this configuration as part of every dynamic page.
Our plan was to use a JSON object for the data and then store it somewhere within each page, as part of that page. We could then enable an editor interface, within the page, that would allow content editors to add, edit and delete rows as needed. Thus when they save the page, they will save the configuration data along with it. We would then be able to read this configuration out on page load, loop over it, and render the required Templates (which are essentially User Controls) and then run some code over each row template to initialise the child Web Part Zones with unique IDs (a problem covered in a later post).
That was the concept, how could we do it.
Where and How to Store the JSON Configuration
Firstly, how could we store the JSON object within the page. My first thought was that we could leverage the Property Bag for the page. If you aren't aware of the Property Bag it is a SharePoint concept where almost every type of object (container) in SharePoint (Farm, Web App, Site collection, Site, List, Item etc.) has an associated "Property Bag" which is a Key/Value pair storage area. It is normally ideal for configuration data, however I had a better idea for this scenario.
Given that we are working with Publishing Pages, we have access to "Fields" within each page. For the project we were working on we had access to a "Base Page" Content Type from which every Publishing Page type inherited. So I added a new field called DynamicPageConfiguration to the Base Page Content Type. This was a multiline text field of type "Note", configured to use 20 rows. As the field was always likely to exceed 255 characters we also had to set the property "UnlimitedLengthInDocumentLibrary" to "TRUE".
So we now had a field available to us on every page in which we could store text (JSON) data. I added this field to the Dynamic Page Template and it showed up on the page as an editable textbox field. You can see in the following code how we wrapp it in an EditModePanel so that it only rendered in the page while in "Edit" mode (funny that). We also set it to be hidden using CSS so that it wasn't actually visible on the page. We didn't want Content Managers to edit the field directly, we would build an interface that then read and wrote to this field in the background.
The beauty of this approach was that SharePoint would save the data in this field for us, without us having to anything. It was just a field on the page. You might notice that the field has an additional CSS Class of "js-DynamicPageConfiguration". This is the selector used from JavaScript when a user edits the page configuration through a popup form. I will go into more detail on that process in my next post.
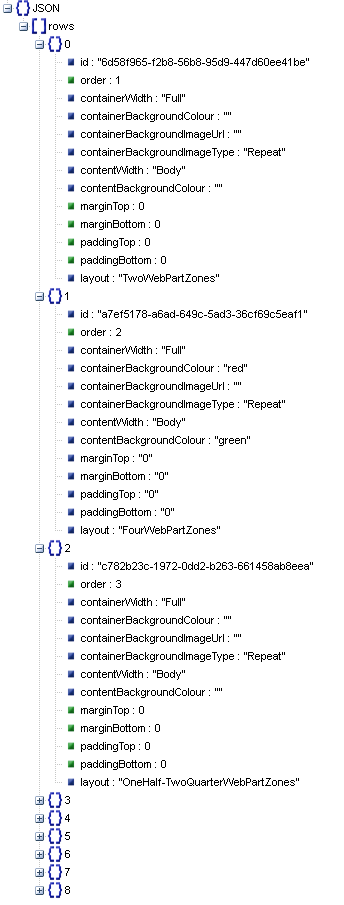
To help understand the configuration data being stored on each page, here is an example of the JSON stored in this field, as viewed using the ever useful online JSON Viewer tool:

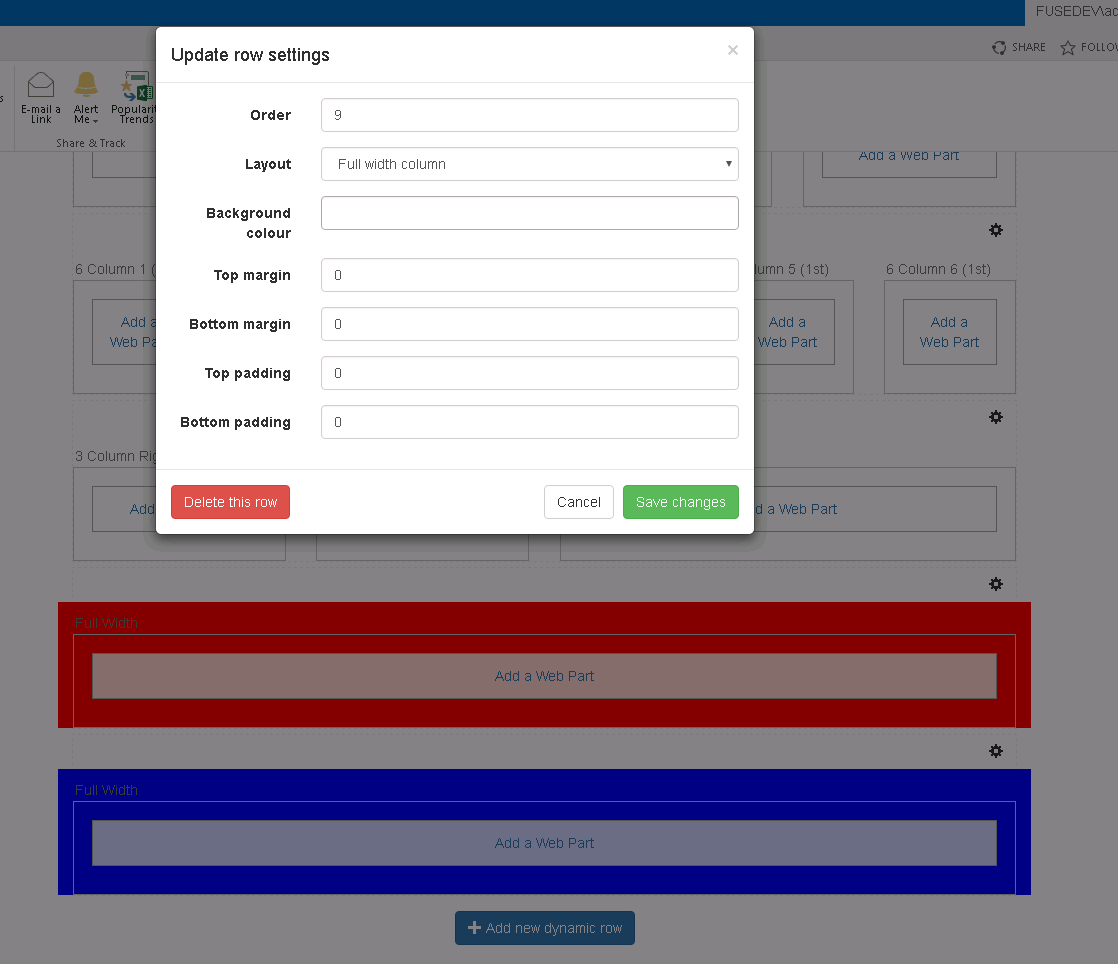
Hopefully the concepts are coming together for you now, and perhaps even making sense (?). Later in this series you will see how we added a control on the Dynamic Page template that iterates over the JSON configuration data above and loads the associated User Controls to render the required columns. Content Managers then interact with this page in edit mode, adding and editing rows of Web Part Zones, and then adding Web Parts into those zones. Here's a sneak preview of how that looks. In the screen grab below I've just clicked to edit an existing Row (using the Cog icon in the top-right of each row). You can also see the option to "Add new dynamic row" along the bottom, which initiates the same form.

We cover how the above form works in the next post - Dynamic Page Layouts in SharePoint 2013 - Part 3
About the author
James Strugnell
Head of Development
Your business might need more than just Microsoft packages, and this is where James’s expertise and experience comes to the fore. He is responsible for the custom development of online solutions that increase your productivity, efficiency and collaboration between staff. This includes the development of bespoke software as well as tailoring Microsoft’s suite of products so that your needs are met.


